7/6-8/10 I went up to Camp Serendipity for 3 days: Tuesday through Thursday.
I arrived at noon in blistering heat. Bert and Ernie were there right away, each with a cloud of mosquitoes around him. We didn’t do much hugging; they got their biscuits and then took off trying to escape the mosquitoes.
When I went up to the cabin I was dismayed to find two mice in the traps. The one on the first floor was very limp so I knew it had been trapped only recently. The one in the crawl space was stiff so I figured it had gotten nailed a day or two ago. That led me to believe that they had gotten in through the crawl space somehow. That was where I did a search for a hole. I didn’t find one.
After lunch and a nap, I installed a shower curtain and rod in the cabin. I was eagerly anticipating my first shower up there. After that, I decided to work in the crawl space where it was nice and cool. I decided to begin installing the extension to the 1” copper water pipe loop. The plan was to run it up into the floor joists along with the pex pipes to keep them from freezing. In looking at the run of the pex pipes and where I might intersect it, I realized that the best thing to do would be to run the copper pipes diagonally from directly above where they entered the building over to the first tee of the pex pipes which is just about in the center of the floor. Since I plan to remove the pex up to that point, there was no reason to follow the right-angle route of the pex pipes. Furthermore, going diagonally would mean less copper pipe and the angle would make it easier to thread it through the joists.
I strung a tight string under the joists to establish the route and then I marked the underside of each joist where the string crossed it. Then I took a 10-inch 3/8” bolt and turned two nuts onto it. I used it as a gauge to mark the heights of the holes I needed to cut in the webs of the joists through which I planned to run the pipes. I wanted the pipe to slope down all the way, so I measured the amount of vertical freedom I had by spacing the nuts on the bolt so that the bottom one was even with the bottom flange of a joist and the top nut was even with the level of the bottom of the highest hole I could make. Then I counted the threads between the nuts and divided by the number of joists I had to span. The quotient turned out to be close to four.
So holding the bolt against the mark on the first joist, starting with the low nut on the flange and the high nut one inch up, which was the center of the first hole, I marked the web of the joist at the top nut. Then I turned the top nut up exactly four turns and proceeded on to the second joist and marked it. I continued in this way to mark all the joists. I had colored one facet of each nut with a magic marker to make it easy to know when I had made a complete turn of the nut. In this way, the hole pattern gradually goes up hill and yet keeps them in a nice straight line.
I used a 2” hole saw to make the holes but when I sighted through the row of holes, they appeared as vertically aligned ellipses because of the angle of the route. That meant they presented a less-than-2-inch width for the pipe. And since I needed to run two pipes, one for supply and one for return, the holes were not wide enough. And, I figured that I had better enlarge the holes before I installed the first pipe.
So I cut a second hole in each web overlapping the first hole by about an inch. Then I started threading the first pipe through.
First I straightened about a foot of the end of a coil of copper pipe and then I suspended the coil right under the joists using two clamps and a length of cord. Then, little by little, I pushed the straight end of the pipe through the hole in the first joist and then straightened the coil as much as I could. This allowed me to push the pipe a little farther into the hole and then, in turn, I could unroll and straighten the coil a little bit more.
As the pipe went through the second hole, I could straighten out obvious big curves by levering a short 2x4 against the floor and the pipe. The straightening was mostly all done there between the first and second joist, and occasionally a joist or two further on. But I was surprised at how the pipe proceeded through the string of holes most of the time without my even having to feed the end of the pipe into the holes. I was very pleased that I could see that the method was going to work. I wasn’t even sure I could do it at all at the outset.
With the concept proved and the first pipe all the way through the joists, I quit for the day and took the long-awaited first shower in the cabin. It was wonderful. I had forgotten to close the valve at the trailer all the way so the pressure wasn’t at the maximum. The water filled only about 80% of the holes in the big shower head, but that was enough for a delightfully pleasant warm shower. It was great having enough room to stand up straight and move around in the bathtub. It was also delightful to be able to look out over the top of the shower enclosure, through the studs, and see the living room log walls and the mountains through the living room windows. That view won’t last once the drywall is hung, but it makes for a very pleasant shower in the meantime.
On my way down to the trailer for dinner, I stopped and fed a flock of gray jays with one hand while I fed a chipmunk with the other hand. Great fun.
On Wednesday morning, I discovered that the trap in the crawl space was sprung but the bait was still intact. The traps upstairs were still set. I figured that I probably had accidently set off the lower trap myself. At least I hoped so. I reset the trap and did a little more checking for holes. I didn’t find any.
I started working on the bathroom wiring by removing the wire to the ceiling fan. It was a 12-2 sunlight resistant cable which was too big and hard to work with. I’ll replace it with a 14-2 Romex. I spent some time trying to figure out how to place the boxes and design the wiring but I figured that I should do that at home instead wasting time on it here. Instead, I went back down to the crawl space and worked on the second copper water pipe. On the way I fed the chipmunk a handful of peanuts.
Since I had already strung the first pipe, I didn’t have too much trouble stringing the second one alongside of it. I cut the remainder of the coil loose from the pipe so that the pipe is nearly in position to join it to the existing loop. Then I decided to clear out a bunch of old boards that were behind the big wood toolbox and the foundation where the pipes come inside. Once the wood was removed, I could see that the screen covering a drain pipe going through the foundation had been dislodged and I am pretty sure that is how the mice got in. I fixed the screen and hope that I don’t see any more mice for a long while. I think the plumbers might have knocked that screen loose when they hooked up the pex piping.
I spent some time studying the problem of doing the plumbing to complete the copper loop and to connect it to the existing pex pipes. But I will need a bunch of fittings for that which I don’t have so I couldn’t proceed much further.
I went upstairs and made several wire templates out of short lengths of copper wire that I will use to make small 2x4 backing blocks for the drywall. This will be a tedious job that I have been thinking about for a long time. My plan is to make short trapezoids from 2x4s that I can screw to the log walls over the top of the chinking and in line with the stud walls to provide backing for the drywall. Then the drywall can be scribed to fit up against the logs and chinking and screwed to the little trapezoids to strengthen it. I’ll probably do that scribing myself because I don’t think a drywall crew would either have the patience to do it, or that they would do a good job. I can give them a straight edge on the middle of a stud to interface with it. That may not be how it works out, but that is my plan for now. I’ll save time at Camp Serendipity by making the blocks at home. The wire templates will show me how to make them.
Next I took the old Trapper Nelson backpack in and inspected it. I have had it hanging outside under the eaves for a long time. On rainy days, I laid it directly under the drip line so it would get soaked by the rain. The packrats had stunk up the canvas backpack so bad that I couldn’t stand the smell of the thing when I had it inside in the crawlspace. I decided that if I couldn’t get rid of the smell, I would get rid of the backpack. I was very happy to discover that the backpack was now free of the smell and was nice and clean. I had disassembled it so now I put it back together and stored it inside. The backpack has proved very useful throughout the building project, especially in the early days. I used it to haul concrete blocks, sacks of cement, and even sand and gravel. It has become like an old friend. I’m glad I didn’t have to get rid of it.
Finally, I took another shower before I went in for dinner. This time I shut the valve at the trailer completely off so there was enough pressure to fill every hole in the shower head. It made for a slightly better shower than the night before. As before, I enjoyed the view out the window as I showered.
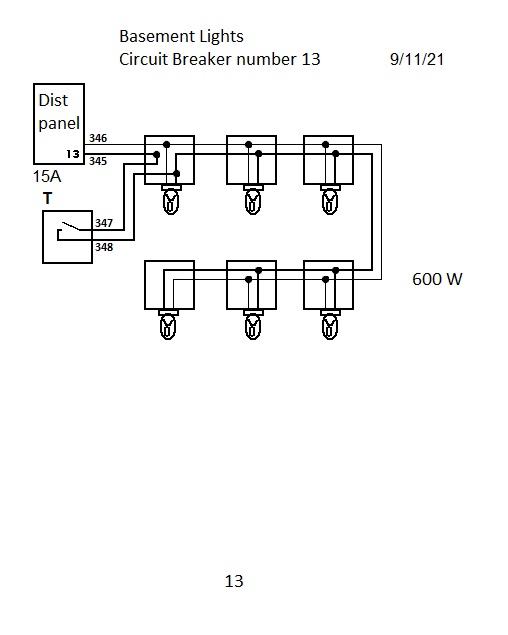
On Thursday morning, I designed the crawlspace lighting circuit. The lights down there had been installed in a temporary way using a wire that plugged into an outlet in the kitchen. I decided to install a separate 15A circuit for the six lights with a switch on the wall just inside the door. Then I went to work on the installation of the circuit.
I bent a piece of ˝” EMT and attached it to a handy box. Then I fastened the handy box to the foundation wall with a Ľ” anchor. The EMT runs up into the joist space. Next, I strung a length of 14-2 Romex from the distribution panel down through the floor and through the joists over to the site of the first fixture. I also strung a cable from the handy box up through the EMT and then through the joists to the site of the last fixture. By that time it was time to quit for the week. It was very hot outside so I was glad to have a project in the crawlspace to work on. I fed the chipmunk several times when I went outside. I left for home at 1:15 feeling very good about the new milestone of having a shower in the cabin.
©2010 Paul R. Martin, All rights reserved.
Go to Next Journal Entry
Previous Journal Entry
Index to all Journal Entries