Now that I have 22 out of 32 pairs of rafters in place, I think I have all the kinks worked out in my one-man method of installation. The rest of the rafters should all be installed fairly routinely. This document describes how I install a 24 foot and a 40 foot pair of 11 7/8" TJI rafters on a 7/12 pitch roof assuming that nothing goes wrong and no shimming is necessary. The short rafters bear on two purlins plus the ridgepole, and the long rafters bear on four purlins plus the ridgepole. Four nails are used at each bearing. Italic letters refer to the diagrams following these steps. These are the steps:
1. Miter the downhill end of a long rafter (I usually do five at a time) which is in the pile in front of the trailer.
2. Pick up the uphill end of the long rafter and drag it up so that it rests on top of the bundle of OSB sheets that is just uphill from the rafter pile.
3. Take a four foot loop of light rope and throw a girth hitch around the uphill end of the rafter. Wrap the other end around your wrist and grip the rope so you can pull the rafter.
4. Pull the rafter up over the OSB stack and into the woods at the end of the hairpin turn.
5. Come back out of the woods and hitch the rope to the other (mitered) end of the rafter.
6. Drag the rafter back out of the woods and up the roadway toward the building. Set the end down on a pile of scrap log sections.
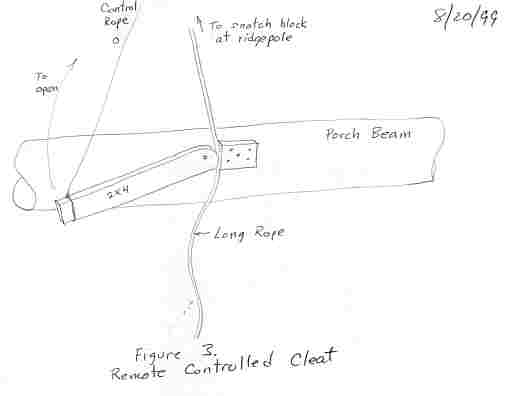
7. Get the hook end of the long rope that goes through a snatch block on the ridgepole at the new rafter site. (See figures 1 and 4) From the snatch block, the rope runs over the top of the 4 purlins and down to the ground. Fasten the hook end around the rafter about 5 feet from the end and throw a half hitch in the rope around the rafter about 4 inches from the end so the standing part of the rope runs under the underside of the rafter.
8. Pull on the other end of the long rope, which feeds through the door or window opening, depending on the location of the new rafter. This lifts the end of the rafter up in a manner reminiscent of a cobra coming up out of a basket.
9. Unless you are lucky, the rafter will get hung up when it hits the first purlin. If it does, cleat the rope with the Remote Controlled Cleat (figure 3), and then use a long stick to try to get the rafter to hop up onto the purlin.
10. This process may have to be repeated several times as the rope typically hangs up on the purlin also at the half hitch and at the hook loop. The rope may be cleated in the same way to hold the rafter for any other reason as it goes up. Continue pulling the rope until the rafter is all the way to the ridgepole and lying on top of the purlins (figure 1).
11. Cleat the rope with the Remote Controlled Cleat for the final time to hold the rafter in place.
12. Go to the short rafter pile near the west corner of the building and miter one (or five) of them on the end toward the building.
13. Drag a short rafter over toward the building and prop the mitered end on top of a concrete block.
14. Take the rope hanging down from the roof and tie a clove hitch around the short rafter a little above the center point of the rafter. Then throw a half hitch around the rafter about 4 inches from the end.
15. Get the hammer, nails, drill, shims, steel strap, and 3 prefabricated blocks (see b in figure 1) and climb up to the southeast scaffold. Place one of the blocks in the temporary position on the southeast wall as shown in figure 1.
16. Climb up a pair of rafters to the next purlin. From there you can reach the Hanging Scaffold (j in figure 2) so you can temporarily store the other two blocks.
17. Back at the purlin, turn around so that you are sitting on a rafter with your feet on the purlin, one on each side of the rafter. You can relax in this position with both hands free.
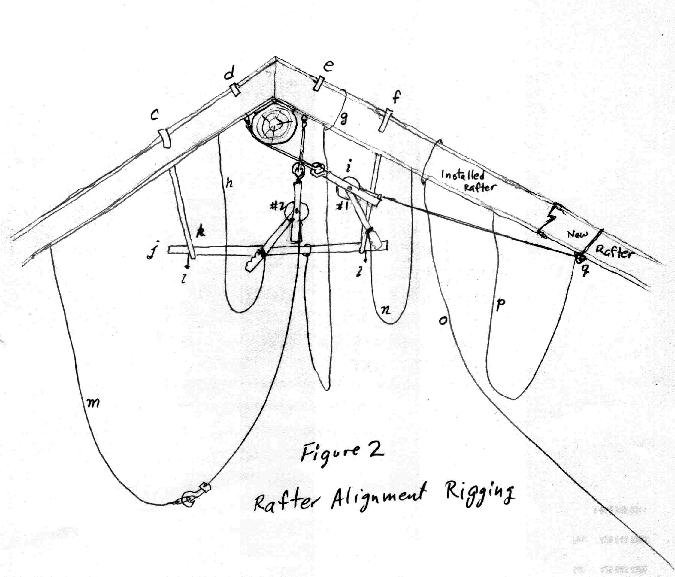
18. Grab the tether rope (p, refer to figure 2 for steps 18 through 22) and retrieve the hook (q) from the #1 come-along (i).
19. Wrap the cable around the new rafter as far down as you can and hook it to itself. The hook should be under the bottom flange of the rafter.
20. Climb up a pair of rafters up to the ridge, pick up the two blocks, and step onto the Hanging Scaffold (k).
21. Retrieve the #1 come-along using the rope (n). Switch it to pull, and using rope (n), crank it up until it pulls the new rafter up just to the ridgepole. This will take the tension off the long rope.
22. Pull the control rope (o) to release the Remote Controlled Cleat. This will slack the long rope.
23. Remove the half hitch of the long rope from the end of the new rafter, open the snatch block and take the long rope out.
24. Unhook the snatch block from the chain (see figure 4), remove the chain (r) (it will be slightly tangled with the #1 come-along's rigging), and move the chain out on the ridgepole beyond the new rafter site.
25. Fasten the snatch block back onto the chain, and put the long rope back into the snatch block. Using the tether rope (s) lower the snatch block and rope and let it hang from the chain.
26. Get back on a pair of rafters and go back down to the southeast wall. Sit on a rafter with your feet on the wall so your hands are free.
27. Unclamp the 3 foot pipe clamp and use it like a wrench to grip the top flange of the new rafter and rotate the rafter 90 degrees. Now, instead of lying flat, the rafter is standing on edge in its normal position.
28. Tighten the pipe clamp onto the rafter flange and let the pipe lie across the tops of the last two rafters installed.
29. Use the pipe clamp as a handle and lever to wiggle the new rafter into position. The main thing is to make sure it is not sitting on top of any of the temporary spacers (a). Ideally, it should be snug against each of the temporary spacers (a) and the prefabricated block.
30. Climb back up to the ridge, get one of the prefabricated blocks, and climb down to the northwest wall. Set the prefabricated block aside.
31. Loop the standing part of the long northwest rope around the central purlin so you can take up the slack over the purlin as you pull on the rope to lift the short rafter.
32. Pull the mitered end of the short rafter up to the roof level and position the rafter so that it is leaning against the building with the mitered end resting against the wall and the last installed rafter.
33. Unfasten the half hitch in the rope around the mitered end of the rafter, and take up the slack in the rope so it is fairly tight from the wall to the purlin.
34. Pull on the rope to raise the short rafter off the ground. The mitered end will go up in the air about 10 feet above the wall before the clove hitch runs into the existing rafter and the ceiling board on top of the wall.
35. Holding fast to the rope so the rafter doesn't drop, use your feet to free the clove hitch so you can pull the rafter up higher. When the knot clears the wall, the rafter will begin tipping toward the ridgepole as you pull it higher.
36. When the rafter is high enough to lie down flat on the purlins, hold it with one hand while you take up the slack around the purlin with the other. When the rope is taut, you can easily hold the rafter with the rope and take a breather. You will be well ready for a little rest break at this point.
37. With your foot, push the new rafter out far enough so that you can lay the prefabricated block on the ceiling board as shown in figure 1.
38. Keeping the rope taut as you go to keep the rafter from sliding back down, climb up to the middle purlin and cleat the rope around the handle of the clamp that is clamped to the last rafter installed. This will hold the new rafter so your hands will be free.
39. From this position, grab the rope and pull the new rafter up further until it reaches the ridgepole. Then cleat the rope again on the handle of the clamp.
40. Using the tether rope (m, figure 2) retrieve the hook from the #2 come-along. Fasten the come-along cable to the rafter just as in step 19.
41. Uncleat the big rope from the clamp handle and let the rafter slide back so the come-along is holding it and the big pulling rope is slack.
42. Untie the clove hitch to free up the big rope. Coil it up and throw it over the northwest wall so it is ready for the next short rafter.
43. Unclamp the long clamp and use it just as the pipe clamp was used in steps 27 through 29 to right and position the new rafter.
44. Climb back up to the ridge and stand on the Hanging Scaffold. (Refer to figure 2 for steps 44 through 62)
45. Using ropes n and h, operate the handles of the #1 and #2 come-alongs to pull both new rafters up to the correct position at the ridge. Sight across the peaks of the last two rafter pairs and out to the end of the ridgepole to make sure the new rafters are in line. Ideally, the come-alongs should be one click too tight, because as the nails are driven, the rafters tend to slide back down a little. Don't worry about being too exact at this point, though.
46. Drill 8 pilot holes (I used a 5/32" bit for 16d galv. common nails) in the lower flanges of both rafters, and start 8 nails into the flanges.
47. Take the prefabricated block and use it to push the rafters out on the ridgepole to the correct position so that the bottom flange on the block is bearing against the bottom flange of the rafter it will be nailed to. Only one block is used for each rafter pair at the peak and they alternate between the short and long rafters.
48. Choose one of the rafters to nail first. It is usually the one that will be nailed to the new block, but other circumstances like the need for shims may dictate starting with the other rafter. The key thing is to get the best possible alignment of the peak.
49. At this point, the come-alongs usually are switched from pulling to relaxing. Since the switch is out of reach, use a shim or a steel strap to push on the switch while holding the handle up with tether rope n or h. If the come-along is set to relax, and you want to pull for one click, you can temporarily switch to pulling by using a shim or strap to engage the pawl in the toothed wheel while you pull on the handle using the tether rope.
50. Sight across the tops of the rafters again as you drive in one of the nails. Start with one of the outside nails so that the bottom flange of the new rafter is driven snug against the block to get the correct lateral positioning. As you drive the nail through the flange, keep sighting and adjusting the come-along if necessary so that as the nail begins to penetrate the ceiling board on the ridgepole, the rafter will be in exactly the correct position.
51. Finish driving that nail home, then drive the two nails in on the opposite side of the rafter. This will somewhat relax the bind on the block because that first nail, being driven in at an angle, will have snugged the rafter up against the block pretty tightly.
52. Drive the fourth nail in, and relax the come-along holding that rafter as much as you can so there is enough slack in the cable for the next rafter.
53. If the rafter just nailed in is the one the block will be nailed to, continue with these steps in sequence. Otherwise, do step 56 before doing steps 54 through 55.
54. Position the prefabricated block where it is supposed to go and drive in all four nails that are already started in the lower flange.
55. Drill and nail the two adjacent rafters through the upper flange into the prefabricated block.
56. Position the other rafter with its come-along and nail it in place while keeping the bottom flanges lined up.
57. Relax the come-along for that rafter just as you did in step 52.
58. Change bits in the drill to make pilot holes for the #10 joist hanger nails to fasten the steel strap across the peak. (I use a ____ bit)
59. Drill six pilot holes and nail one side of the steel strap to the top of one of the new rafters.
60. Using a hammer, bend the strap over the top of the peak so that it is snug and lines up with the rafters. Make sure top flanges are in exact alignment.
61. Drill and drive in the six nails to fasten down the other half of the strap.
62. Change the drill back to the bigger bit.
63. Retrieve the snatch block using the tether rope (see s in figure 4) and disconnect it from the chain.
64. Position the chain around the ridgepole and up and over the new short rafter as shown in figure 4.
65. Put the long rope back through the snatch block and position it so it is ready to pull up the next long rafter.
66. Take the drill and the hammer and maybe some shims, climb onto the ridge, and climb down to the purlin on the northwest side.
67. If necessary, straighten the temporary spacer (see a in figure 1). Pulling the rafter will frequently rotate these out of position.
68. Drill the four pilot holes in the flange and start the nails.
69. Starting with one outside nail, as before, drive all four nails in.
70. Remove the temporary spacer and nail it to the purlin on the other side of the new rafter to be ready for the next rafter.
71. Unfasten the come-along hook from the rafter and let it hang down.
72. Go down to the northwest wall, drill and nail the flange of the rafter to the wall.
73. Nail the prefabricated block in position between the rafters just as at the peak.
74. Go back up over the ridge to the first purlin on the southeast roof.
75. Follow steps 67 through 71 at this location.
76. Unfasten the hook end of the long rope from the new rafter, coil up about sixty feet of the rope, and throw the rope down over the purlins ready for the next long rafter.
77. Go down to the southeast wall, and follow steps 72 and 73.
78. Continue down to the middle porch purlin and follow steps 67 through 70.
79. Continue down to the lower porch purlin and follow steps 67 through 70 except that four 20d galv. nails should be used instead of 16d galv. nails. This is in lieu of hurricane straps.
80. Go back up to the ridge and stand on the hanging scaffold to move all the rigging out for the next rafter. (Refer to figure 2 for steps 81 through 89)
81. Start by moving the two come-alongs. Unhook the hooks (d and e) and hook them back on to the new rafters.
82. Climb up and sit on top of the ridge. Lift up on the hanging scaffold plank (j) using tether rope, g. This rope is tied to the plank off center so just one end of the plank will lift up at first.
83. Grab the bracket, f, as the plank lifts so it won't slide down the rafters. Lift the plank up with the tether in one hand until the nails, l, on the underside of the plank clear the bracket. Then with the other hand, lift the bracket, f, out of its place and replace it in the new position hanging on to the new rafter.
84. As you pull up on the tether, guide the end of the plank so that it contacts the bottom of a rafter. Then as you continue to pull up, the other end of the plank will begin to rise.
85. Grab the other bracket, c, and when the nails, l, have cleared it, lift it out and put it into its new position.
86. Slowly lower the tether until the plank is hanging free and vertical. Then lift it up and out from between the rafters, and lower it back down between the new pair of rafters.
87. By holding one end of the plank with your hand and lowering the plank with the tether, you can guide the lower end of the plank through the bracket without touching it. If you touch it, there is a chance the bracket will take off and slide down the rafters to the purlin, and you will have to go get it.
88. Once the low end nails are past the bracket, the plank can be lowered to rest on the bracket, and then the other end can be lowered to rest onto its bracket.
89. The last thing is to move any of the tether ropes, or the remote controlled cleat rope, that have become tangled, or are too far out of reach from the new scaffold position.
90. Climb down, take a break, and you are now ready to start at the beginning with another pair of rafters.
©2002 Paul R. Martin, All rights reserved.