The Scaffold System
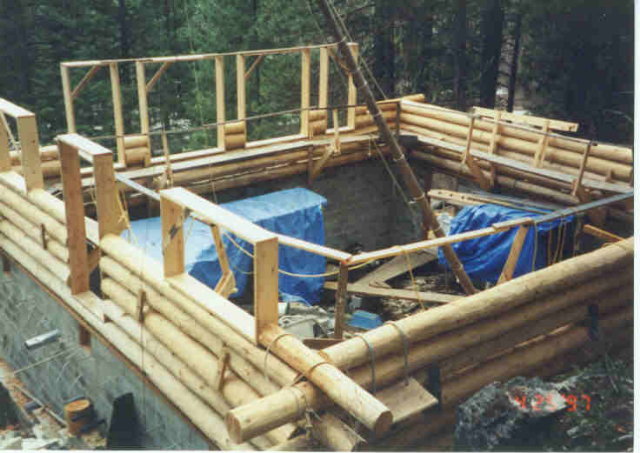
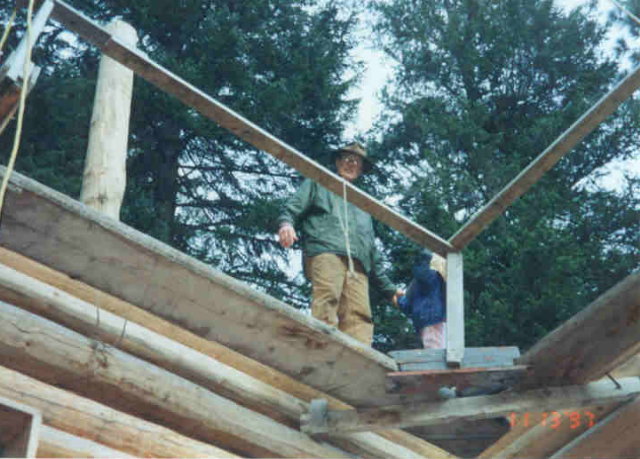
This page contains a brief description of the design of the scaffold system I used on the log walls. As you can see in the picture below, the scaffold ran around the entire inside of the building. It was raised up every three or four courses as the walls grew. The scaffold planks were supported by two scaffold brackets on each wall and a diagonal member in each corner. You can see the brackets on the far walls in the picture. The brackets were fastened by 1/2" threaded rods that ran through the wall between the logs. The rods ran through short 2x4s on the outside of the wall and had a nut and washer on each end. You can see some of the short 2x4s on the outside of the leftmost wall in the picture.
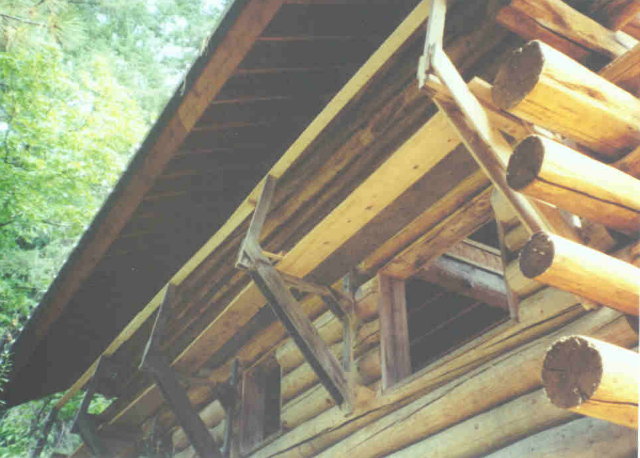
Once the walls were built, the same scaffold system was used on the outside of the building for staining and chinking. In the next picture, you can see the scaffold on an outside wall. You can clearly see the brackets and the undersides of the planks and handrails in this picture.
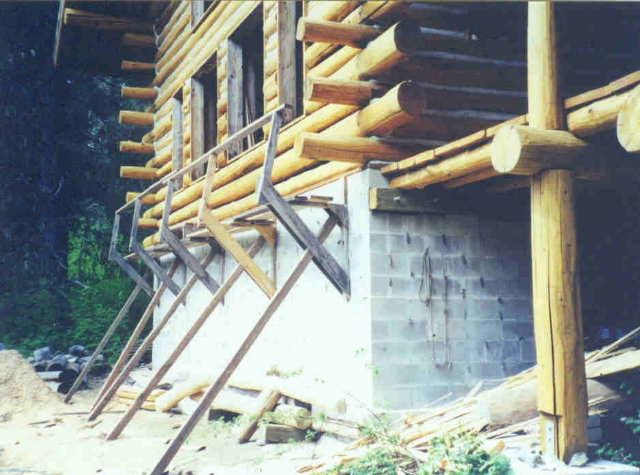
As you can see in the next picture, the brackets were designed to be supported by the threaded rods, or by 2x4s or 4x4s going down to the ground, or by both.
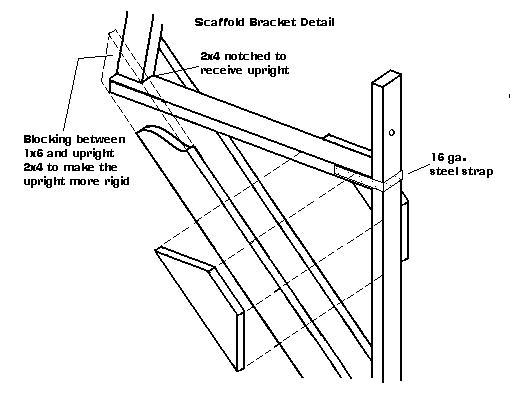
The drawing below shows the design of a scaffold bracket and how the handrail and planks are supported by it. The upright 2x4s, or stanchions, supporting the handrails are slanted inwards in order to minimize the tripping hazard and to help keep your body over the planks. Since the log diameters vary, the short 2x4 on the outside will typically not be square with the threaded rod, so the oversize hole makes it work anyway.
At a typical joint in the planks, the bracket supported only one of the planks. The other plank was supported by two Z-brackets fastened to the cantilevered end of the supported plank. These Z-brackets were made from 16 gauge strap steel with six joist hanger nails in each end of each Z-bracket. The Z-bracket is nailed to the top of the supported plank and on the bottom of the plank hanging from it, as you can see in the drawing.
The 1x6s can be fastened to the 2x4s either with screws or nails, but it it important to fasten the two 2x4s with a 16 gauge steel strap as shown on the next drawing.
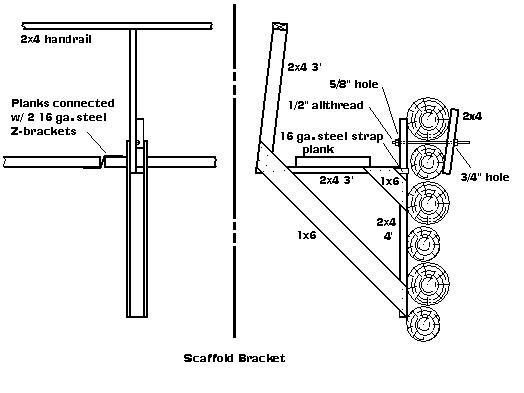
The 1x6s provide plenty of vertical support and strength, but in order to keep the horizontal 2x4 from pulling away from the vertical 2x4, the steel strap is installed as shown. The steel strap comes in coils and it is pre-punched with holes for the joist hanger nails. This stuff has so many uses, I always had a coil of 16 guage and one of 20 gauge around all the time. I think you should use six nails on each side of the horizontal 2x4 and three or four nails in the vertical 2x4.
The stanchion (upright 2x4 supporting the handrail) is made rigid by fastening it into a notch cut in the horizontal 2x4 as shown on the drawing. This puts it flush with one of the projecting ends of the 1x6s. The space between the stanchion and the other 1x6 should be filled with plywood scraps, or other wood blocking so that that both 1x6s can be securely fastened to the stanchion. This method seemed to make the handrail system plenty strong.
In the corners of the building, the scaffold planks were supported by either a 4x4 or a 2x6 on edge that was bolted to the wall diagonally across the corner with 1/2" threaded rods the same way the brackets were fastened. A 2x6 was used on the corner in this picture. The handrail stanchion for the corners was sort of jury-rigged for each corner. The method shown in this picture worked out pretty well. The stanchion was fastened to the board structure you see. This needed to be removed and re-installed each time the scaffold was raised.
In the next picture you can see that the bracket right behind me is supported by a 2x4 going down to the ground. It is also bolted through the wall. That is because by building the window frames in as I went, the wall didn't have much lateral support at this point and the weight of the scaffolding tended to pull it out of plumb. By adding the 2x4 brace, the wall was held plumb. When it came time to put the full length log over the top of the window frames in this wall, I used a pipe clamp and overlapping 2x4s for the scaffold brace. The pipe clamp went between the ends of the overlapping 2x4s and by turning the handle on the clamp, I could adjust the plumb of the wall and draw it up exactly plumb before I drove the rebar spikes in. Once the spikes were in, the wall had lateral support and it stayed plumb without the scaffold brace. This was a handy side benefit of this scaffold system.

Raising the scaffolding
Raising the scaffolding to the next level was pretty easy. The Z-brackets make a flexible joint so they don't have to be removed when the scaffold is raised. They allowed the joints in the planks to bend either way. Here are the typical steps in raising the scaffolding:
1. Remove all the handrails from the tops of the stanchions. Using screws makes this pretty easy.
2. Remove the make-shift stanchions from the corners. Some of mine were built on the diagonal member and these sometimes didn't have to be removed. Others were attached to the planks and these, if I remember right, usually had to be removed. You just do what you need to do.
3. Choose one plank section to lift first. You have to think through the reasons for picking one over another.
4. Wrap a choker (I typically used a loop of rope which I doubled and ran through itself) around the plank. If you want the plank to remain more or less level as you raise it, choke it near the middle; if you want to lift one end of the plank, choke it near that end. You have to think this through also.
5. Hook the crane hook to the choker. It was extremely convenient to have a crane handy for this process. For the back wall where the crane couldn't reach, I chained a come-along up on the mast and used that.
6. Lift the plank up off the scaffold bracket and raise it high enough so the bracket can be re-installed higher up in the new location. The crane holds the plank up while I do the next few steps.
7. Tie a light rope around the horizontal member of the scaffold bracket near the vertical member. Throw the end of the rope up over the log wall and over something (like the top log itself) and then bring it back down so you can pull it tight and tie it off. This takes the weight of the bracket (which isn't all that heavy) off the threaded rod and makes the rod sort of loose.
8. Take the nut and washer off the inside of the threaded rod. This can usually just be done by hand since it is now loose.
9. Go to the outside of the building (or however else you can reach it) and pull the short 2x4 and the threaded rod out.
10. Back the nut off a few inches to effectively make the rod longer.
11. Stick the threaded rod, with its 2x4 on the end, through the wall between two logs up higher in the new position.
12. Back on the inside of the wall, lift the scaffold bracket (which is now just hanging from that rope) with your left hand while you pull on the rope with your right hand. When the bracket is at the right height, tie the rope off again to hold it.
13. Check to see if the bracket will hang vertically in the new position. If it hangs so that the horizontal member slopes down away from the building, don't worry about it. But if it hangs so that it slopes down toward the wall, then you need to shim between the wall and the top of the bracket. For this purpose, I had several short pieces of 2x4 or 2x6 with a 3/4" hole in the middle. By placing one or more of these over the threaded rod before attaching the bracket, the bracket can be made to hang plumb.
14. Wiggle the bracket around so that the threaded rod pokes through the hole enough to get the washer and nut on.
15. Tighten the nuts to hold the bracket in the correct position. Don't have a lot of extra rod sticking out on the inside or you will scrape up your ankles. The extra rod should be on the outside.
16. Untie your rope and remove it from the bracket.
17. Lower the plank onto the newly raised bracket.
18. Go to the next bracket, or corner brace and raise it the same way.
19. When all the brackets are raised, the next step is to check each bracket for alignment. You want to have the horizontal members parallel and pretty near horizontal.
20. If the bottom of the bracket does not touch the wall, or if it is out of plumb and the bracket is sloping down away from the wall, you need to shim it with a piece of board or 2x4. The shim can be screwed or nailed to the bottom of the bracket to hold it away from the wall. If you don't provide backing like this to the bracket, the scaffold will be springy when you walk on it and it probably could damage the bracket and wouldn't be safe. At least it wouldn't feel safe.
21. When all the brackets are level and firm, go up and re-install the stanchions on the corners and all the handrails.
22. Take a bunch of shims with you and go up on the scaffold and walk on it. Shim between the planks and the brackets until the whole thing is solid when you walk on it, and you are done until the next lift.
When it is time to raise the scaffold, you will be used to walking on it where it is. There is a nice rail on one side and a fairly high wall on the other side. It feels as secure as walking on a sidewalk on the ground. But after you raise it, it feels a lot different. The wall is now only one log high, there is no handrail (until you put it back on) and the planks rock and wobble (until you shim them). But once you get the handrails and the shims in place, the scaffold feels just as safe and comfortable as before. The whole system works great.
©2005 Paul R. Martin, All rights reserved.