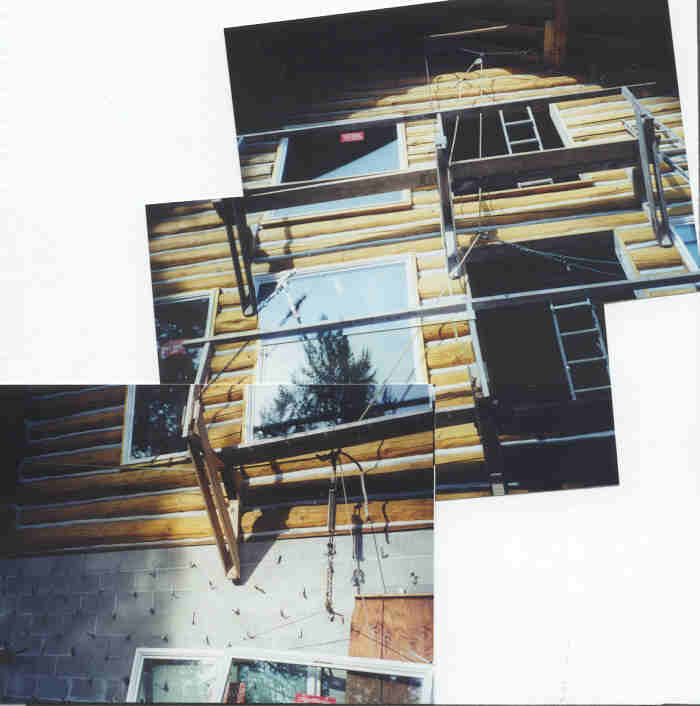
Since it might be hard to follow the description in my Journal of how I installed the windows, and because of a specific request for how I set up the lifting rigging, I have decided to write this piece. I have drawn an accompanying diagram which should make this description a little easier to follow. There is also a composite photo of the real thing. Don't forget to consult the Glossary if you run across any unfamiliar terms. (I have made that a little easer by making a link out of the first mention in this piece of each of the terms that are in the Glossary.)
I'll describe the most complicated rigging, which is what I used for the top big window between Grid C and Grid D. The more-or-less mirror image rigging I used for the other two big windows to the left was simpler because the stack of windows was almost directly below the openings. For the Grid C-D windows, however, the windows have to be moved quite a ways to the right before I could start lifting them. You can see on the diagram how the rope hanging from the high pulley had to be kept away from hitting the scaffolding. I'll describe in detail how that worked.
First, I'll describe how I set the rigging up, pretty much in the sequence I did it, and then I'll describe how I used the rigging to lift the highest window and install it.
The diagram shows some of the scaffolding I used. There were three scaffold brackets bolted to the wall below each row of windows as shown on the diagram . There were one or two planks spanning each space between the brackets and there was a plank between the Grid D bracket and a Grid E projecting wall log. The scaffolding had handrails attached and they are shown on the diagram as well. (There is a minor error on the diagram : The plank and the handrail should be resting on the next lower projecting Grid E log ends.)
Not shown on the diagram was a two-tier steel scaffold tower set up between Grid D and Grid E, and a 20 foot ladder set on the first level of this tower going up to the log wall at Grid D about even with the middle of the top window openings. This was to allow me to get on and off the scaffolds from the outside. Before the windows were installed, I accessed the scaffolding from inside the building using a ladder to the top openings. The lower openings were accessible from the floor.
Now for the rigging process: I hooked the end of my Long Chain to an 18-inch S-hook made of #4 rebar. Then, standing on the top scaffold, I was able to reach up and hook the other end of the S-hook to the inner Anchor Hook at Grid D. Next, I draped the long chain over one hook in a similar rebar S-hook. This second S-hook was fastened to an 8-foot 1x2 handle which allowed me to reach up and hook the other end of the S-hook to the inner Grid C Anchor Hook.
The chain was sagging down between the two S-hooks so that I could reach it and fasten the pulley to it with a chain hook. The pulley had a long 3/4 inch rope going through it. After learning a little about safety, I used duct tape to securely bind the pulley, chain hook, and chain together so the pulley couldn't hop off the chain when the rigging is slack.
Once this was all hooked together, I pulled hard on the loose end of the long chain to draw it tight, pulling the two S-hooks toward each other as shown on the diagram . Then I fastened the end of the chain to the top Grid C scaffold bracket to hold it fast. This rigging allowed me to support the pulley high enough over the center of the window openings to allow for the sling around the window.
Next, I unrolled two come-alongs all the way, hooked the cable of the first one to a short chain, and then hooked the other end of the chain to the frame of the second come-along. Then, from the high scaffold, I hooked the cable of the second come-along to a loop tied in the rope going through the pulley. I lowered the first come-along down to the deck of the lower scaffold between Grid B and Grid C. Then, from the lower scaffold, I lowered the first come-along all the way to the ground between Grid A and Grid B being careful not to let it crash through the window stacked below. Finally, down on the ground, I attached the first come-along to the Anchor Hook in the center of the foundation wall at Grid A
Next, I had to attach the other end of the 3/4 inch rope to the sling around the window. The sling is a loop of 1/4 inch cable that goes around the window just outside the nailing flange. It is held snugly to the flange at the top by two special clips which are in turn fastened to the flange with 1" C-clamps.
To keep the rope from hitting the top Grid C scaffold bracket, I attached a chain to the Grid D PSL The other end of the chain was fastened to a big shackle and the rope ran through the shackle. When the rigging was pulled tight, it took on the configuration you see in the diagram and you can see how that chain keeps the rope away from the bracket.
Next, the lifting rope needed to be fastened to the top of the sling around the window. But, when I actually lifted the window with this rigging, I wanted to weigh it. So I had my home made scale rigged directly above the sling and ran the 3/4 inch lifting rope through a shackle at the top of the scale. Then I pulled on the rope to draw the knot holding the come-along hook right up against the high pulley. Keeping as much slack out of the rope as possible, I tied a two-half hitches in the rope to hold the shackle.
The next problem was that I was lifting the window from such an extreme angle. In order to lift it more nearly straight up, I tied another 3/4 inch rope, called the Snubbed Rope, to the lifting rope just above the scale as you can barely see on the diagram .
This snubbed rope ran from the top of the scale to the left through the middle of the lower Grid B scaffold bracket and over to the underside of the projecting wall log at Grid A as shown on the diagram . From there, it went up and over the projecting end of the log above it and then back down and over the end of the lowest wall log finally making two complete turns around that log. The free end of the rope hung down alongside the Grid A corner of the foundation wall. The rigging of this rope is called a snub. When it is wrapped around a log like that it is held fast to the log and can hold a huge load. But by simply lifting on the end of the rope to relax the windings just a little, you can gently let the load pull out the rope little by little. It is a very easy and very effective technique for manipulating heavy loads. Whenever I have to lower a heavy load from up high, I use a snub rope and gravity. That way I don't have to use a winch or crank on a come-along.
You might be thinking that the snub rope would work better if it were attached directly to the shackle on the sling, and you would be right. And, that is how I rigged when I didn't include the scale.
Finally, before I could start lifting, I moved the inner scaffold planks out of the way of the rigging by flipping them up on top of the outer planks. The rigging was now ready to begin lifting the window.
Standing on the ground at Grid A, I put the loose end of the snubbed rope under some boards to keep the snubbing tight, and then began cranking on the lower come-along. After the slack was taken out of the rigging, and the window started lifting a little, I would quit cranking, go over to the window, and slide it to the right a little. Since the rigging took quite a bit of weight off the window, it was easy to slide. Then I would crank a few more clicks and move the window again.
After a few repetitions of this, the scale was vertical and the window lifted up off the ground. At this point, I could read the weight of the window on the scale. Incidentally, the window weighed in at 150 lb.
The snubbed rope was in strong tension by this time holding the lifting rope over at a pretty severe angle. Once the window was hanging free like this, I would lift it off the ground a foot or so and then gently relax the snubbing rope just an inch or so. This made the window swing to the right and it would also drop a little lower. When it quit swinging, I would crank the come-along to get it back up pretty high, and then loosen the snubbing rope a little more. The tension on the snubbing rope got less and less as the window moved to the right with successive iterations of this procedure.
When the window was far enough to the right so that the lifting rope was up against the lower Grid C scaffold bracket, I lowered the window and set it on the ground. When it first touched the ground I went over and slid it to the right as far as I could so that the center of it was to the right of Grid C. Then I set it on the ground and relaxed the come-along all the way.
From this point on, I didn't need the snubbing rope or the chain from the Grid D PSL or the scale, so I removed them all from the rigging. I also unwound the lower come-along all the way again. I took the lifting rope up, over, and down the other side of the lower Grid C scaffold bracket. Then, I fastened it to the bridle with a shackle after pulling the come-along hook back up against the high pulley. I was now in a position to lift the window straight up into the opening even though the window was not quite centered under the pulley.
The pulley was high enough, though, so that the lifting rope was pretty close to vertical and it was no problem to slide the window to the right as the rigging tightened up. Once the window was directly below the pulley and was hanging free, I simply cranked on the come-along as far as it would go. That lifted the window off the ground five feet or so.
Then, from the lower scaffold, I could reach the second come-along and I proceeded to crank it until the window was above the level of the lower scaffold deck. Then I flipped the inner scaffold plank back into its position and lowered the window to rest on the plank. As the come-along relaxed all the way, the window leaned against the window opening with the flange keeping it from falling through the hole.
With the window resting on the scaffold, I changed the rigging in order to lift it the rest of the way. I unwound the lower come-along all the way and the upper one part of the way. Then I moved the short chain from between the two come-alongs and put it between the foundation anchor hook and the lower come-along. That way I would be able to operate the lower one from the lower scaffold and the upper one from the upper scaffold.
Next I hooked the window back up to the rigging by pulling the rope down until the come-along hook and the knot were right up against the pulley again. Then I tied the rope to the shackle on the sling. I was now ready to resume lifting the window.
I operated the lower come-along from the lower scaffold and cranked it nearly all the way up. Then I went up to the upper scaffold and cranked the upper come-along until the window was as high as it would go. It was now hanging about a foot out directly in front of the window opening.
To hold the window in the opening, I had screwed four screw-eyes into the log walls alongside the window opening. One pair was near the top and can sort of be seen in the drawing. The other pair was near the bottom and you can't see them in the drawing because of the scaffold planks. A 1/4 inch rope bridle was used between each pair of screw-eyes and they were tied as shown by the upper one in the drawing. At the time I was lifting the window, however, the bridles were not tied that way. They were each fastened to a screw-eye on the left side and the ropes just hung down from there. I fastened the other end through the other screw-eye only after the window was in place.
The first thing was to put the window in the opening dry to see if it fit right. In quite a few cases the opening needed shimming or trimming to make it plumb or square or flat. Once I was satisfied that the window fit properly, I took it back out, caulked the opening, put the window back in, and fastened it in place. Then I removed all the rigging and bridles.
The process of getting the window into the opening went like this. With my hands I pushed the bottom of the window into the opening. That left the window slanting quite a bit so it took quite a bit of pressure to hold it that way. I held it with my knee or hip so I could use my hands to retrieve the lower bridle rope, run it through the screw-eye on the right, tie a tautline hitch as shown in the drawing, and then snug up the tautline hitch. With the bridle snug, I no longer had to hold the bottom of the window in the opening. The bridle held it nicely.
You couldn't push the top of the window in at this point because of the tension on the lifting rope and sling. So the next thing to do was to hook up the top bridle rope in the same way I just did the lower bridle. After snugging up the tautline hitch on the top bridle, I relaxed the come-along 5 clicks. Without the top bridle, this would have made the window lean even farther out. But with the top bridle snug, the window just stayed where it was.
But now, with the lifting rigging relaxed a little, I could push the top of the window almost all the way into the opening. I pushed it in and tightened up the tautline hitch until it was snug again. The bridle then held the window in that position.
Finally, I relaxed the come-along 10 more clicks which removed nearly all the tension from the sling. I could then push the window all the way into the opening and tighten both bridles to hold it there.
To take the window back out of the opening after the first dry run, I simply reversed all the steps. First I loosened the tautline hitch on the top bridle so the window leaned out of the hole a little. Then I tightened up the come-along 10 clicks. Then I untied the tautline hitch in the top bridle and pulled it out of the screw-eye on the right side. Then I tightened the come-along another 5 clicks, undid the lower bridle, and let the window swing out of the hole so it was swinging free again.
After caulking and putting the window back for the final time, I fastened the window with screws through the flanges, removed the rigging, the bridles, and the screw-eyes. Later, I nailed the trim boards on with galvanized siding nails.
When I bought the windows I was told it takes three guys to install windows. I believed that for a while, but after installing a few of the smaller windows, I figured that I could do them all, even the big ones up high, by myself. With the method I just described, I showed that it can be done by one guy. Figuring things like that out is a big part of what makes this project so much fun for me.
©2003 Paul R. Martin, All rights reserved.