11/23/08 Received a detailed email from Ross pointing out several errors and omissions in my wiring plan. I revised my plans to fix the errors and omissions and posted the new plans on our website. Many thanks to Ross.
11/24-26/08 I went up to the property for 3 days: Monday through Wednesday.
I arrived at 12:15 and was promptly greeted by Bert. I was surprised that Ernie was not with him. I gave Bert a couple of dog biscuits and a few hugs by himself. I called and talked to Shirley later to make sure Ernie was OK. He was.
The temperature was right at freezing so I started a fire in the wood stove to warm the cabin up while I had lunch. Since the weather was so nice and still, I figured this was the ideal time to inspect the sequoia trees before the snow falls. I also decided to once and for all clear a trail to the sequoia trees. Each time I had visited the trees before, I had to force my way through a very jumbled vine maple thicket. Not only were there vine maples, but there were fallen trees all over the place because of the root rot kill of the forest. These fallen trees not only contributed their branches to the tangle, but they bent the vine maples over into loops every which way, and they sprouted new trunks, or vines, from these loops and arches.
In most places, the tangle was at least knee deep, and in a few places, it was waist high. Very hard to walk around in, and when the leaves are on, virtually impossible to see through in order to even find the sequoia seedlings. I was finally going to fix that.
I gassed up the chainsaw and to my great relief, it started and ran fine. I took it into the woods and proceeded to cut a trail from just above the privy, to each sequoia tree, on up to the high point of the property. In the process I cut through at least half a dozen big tree trunks and uncounted vine maple trunks. You can now walk a pretty nice trail that roughly follows the northern border of the property.
In the process, I lost count of how many sequoia trees I had found. I thought I counted ten and there should have been eleven. The ground was covered with a frozen layer of big leaf maple leaves, so if there were a sequoia seedling smashed under them, I wouldn't be able to see it. I did a lot of looking, though, and tried to find them all. The ones I found were doing well and their protective sleeves were still standing upright.
It was dark by the time I quit in the woods and my body was very tired. I am not used to doing that much with a chainsaw any more and fighting my way through that tangled mess was a lot of hard work.
On Tuesday morning, my body was very sore, but once I got moving it wasn't too bad. I built another fire in the wood stove and swept off the front porch. While I was sweeping, the four gray jays came by for peanuts. It was good to see them again. They haven't been around for a while.
Now that it was bright daylight, I decided to go back in the woods to count the sequoia trees and look for any I might have missed. I took along some adhesive ID tags I had bought for the electrical wiring. I had more sets than I needed for the wires, so I figured I might as well use them for the trees. That way I could not only make sure I counted right, but each tree would have an ID that I can refer to from now on. I wrapped an ID tag around the top of one of the bamboo sticks holding up the sleeve of each tree. I used eleven tags, which meant that I had found all the trees that I think have survived. The gray jay family found me in the woods while I was there and they got their treats.
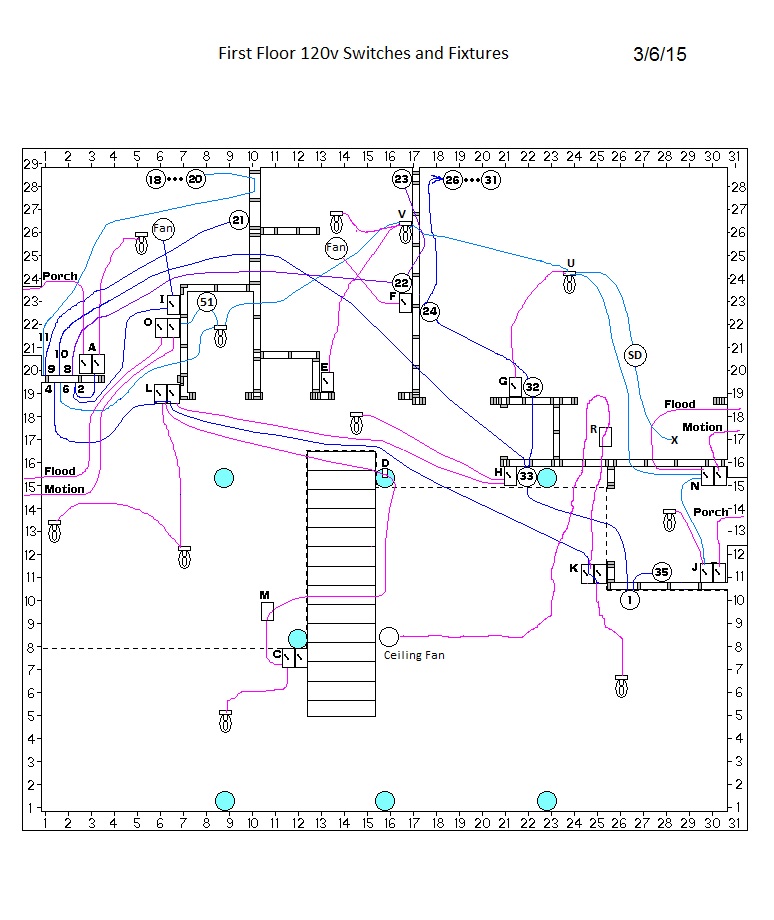
Next I went to work in the cabin which was nicely warmed up. I rebuilt the living room light fixture to fit it with a longer chain and wire. I had that finished by lunch time. After lunch, and a nap, I took the fixture up on the scaffold tower and mounted it to the box I had installed under the Grid D purlin. Then, since I was finished with the work up high, I dismantled the scaffold tower and brought all the frames and cross braces back down to the crawl space and put them away. I stored some of the planks in the utility room and some of them under the back porch.
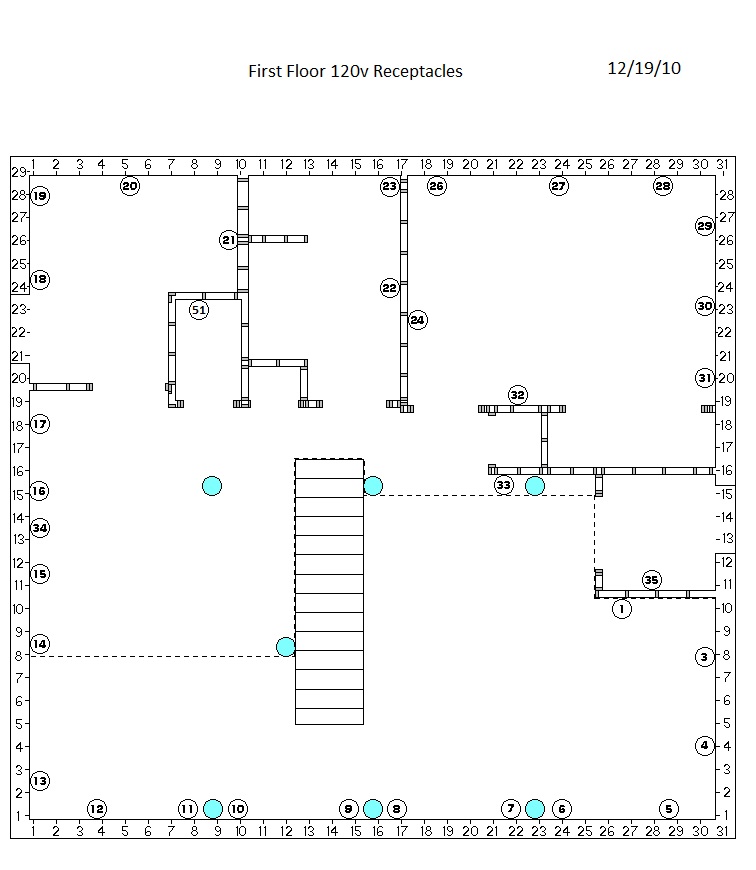
The fixture looked really good to me, but I wanted to see it lit up. I didn't have the glass chimneys for it, which have been on order now for a few weeks, but I installed five bulbs in the fixture anyway. Then I got an idea how I could energize the fixture before I had the wiring done. The end of the wire from the fixture was hanging loose above where switch box K will go, so I decided to wire nut the ends of it to the left over piece of lamp wire I had used. The lamp wire already had a plug on one end of it, so I just plugged it into number 3 and the lights came on. I think it looks great. I was very happy.
With the room nicely lighted, I swept up the chips made from chiseling the purlin and the plugs from the knockouts in the rafters and joists, and then I vacuumed the entire first floor. The place looked pretty spiffy after that.
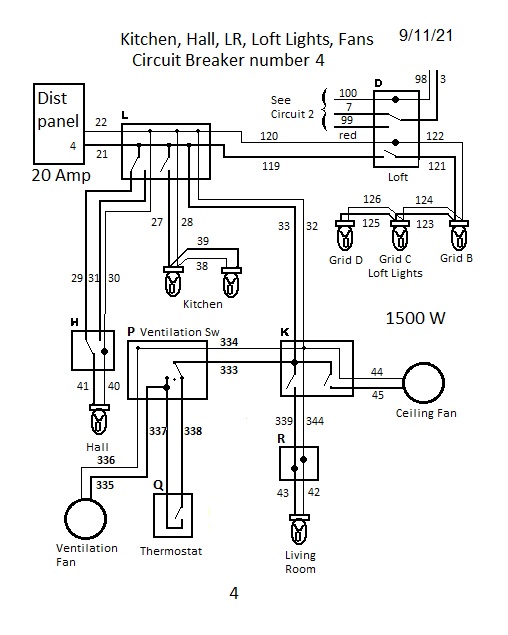
Next I decided to begin wiring up circuit number 4 which will eventually power the living room fixture. I started by trying to install one of those blue plastic double boxes at L. I don't like plastic and was dubious about plastic electrical boxes, but Brian had told me that they were the way to go. So I tried it.
The box has two nails in two triangular flanges on the top and bottom of the box. These are intended to be driven into the stud in order to fasten the box to the stud. Well, in this case, there wasn't enough room between the two studs to get a good swing of a hammer. I tried a couple different hammers, I tried rapid short strokes, I tried to hit the nail with long hard strokes going around the stud, and whatever else I could think of. Nothing worked. I was driving into a single stud, so it bowed with each stroke so that the blow didn't do much good. I tried holding a heavy hammer head on the other side of the stud, and this helped me make at least some progress. To make a long story short, I failed to get the box installed and gave up for the night, a little discouraged, and having gained no love or respect for those plastic boxes.
On Wednesday morning, I lit another fire and took some pictures of the newly installed living room light fixture. Then I went back to work on installing electrical boxes. I started with a fresh, new, double plastic box and tried to install it at K. Here there was a tiny bit more space between the studs than at L, and the stud I was driving into was doubled with another one to make it nice and rigid. I got the two cheesy little skinnier-than-box, probably-Chinese-made, nails driven all the way in, but in the process, the nails bent enough to distort and deform the box. The box also wasn't held tightly against the stud, so the box was not rigid. It wiggled too easily to suit me. Rather than take it out, I drilled a hole in the side of it and drove a drywall screw through the hole and into the stud. This at least made the box sort of rigid. At that point, I decided to leave the box in place, but to use no more plastic boxes in the project.
Not only was the box not firm against the stud, but I didn't like the idea that the screws on the receptacle, or switch devices would only be engaging an eighth of an inch or so of that blue plastic. And not only that, I had just read an article in Science News telling about the enormous problem facing museum curators trying to preserve their plastic specimens. In time, the chemicals in plastic that are not bonded to the polymers eventually migrate and ooze out. In some cases, these chemicals are toxic, in others they leave a disgusting coating, and in others, the plastic is degraded and weakened and maybe even begins to disintegrate. I don't want any of that happening to my electrical boxes. Of course, I suppose that the plastic insulation on the wires, and the plastic conduit will be fine over time. In any case, I have decided to use metal boxes.
I got a metal two-gang box, drilled a couple holes in the side of it, and screwed it to the stud at L. It was very sturdy and I was very happy with it. The only complaint I have with metal boxes is the nuisance and expense of those metal cable clamps. But Brian had introduced me to the plastic (yes, plastic) tube type cable clamps and he had supplied me with a whole box of them. You just knock out the plug in the box, and snap one of those plastic tubes in the hole. The cable then is forced in and that's all there is to it. A metal box with those clamps seem to me to be the ideal arrangement.
I was hoping to install enough of circuit number 4 so that I could turn the living room light on with the switch at K, but I didn't have enough time. I strung the wire (32,33) between L and K but that was as far as I got. I closed up, had lunch, and left for home at 1:45.
©2008 Paul R. Martin, All rights reserved.
Go to Next Journal Entry
Previous Journal Entry
Index to all Journal Entries