3/20-22/12 I went up to Camp Serendipity for 3 days: Tuesday through Thursday.
On the way I stopped at our tax accountant to deliver a document. Then I delivered a screwdriver that a repairman had left at our house. Then I stopped to visit Uncle Charles.
Just as I got out of my truck I was greeted by Marilyn. She had coincidentally decided to visit Charles at the same moment. We went inside and discovered that Charles was out shopping with Mark. Marilyn called Mark who said they would be back in 10 minutes. I visited with Marilyn until they arrived. Then, after a short visit, I proceeded on to Camp Serendipity.
There was a lot of new snow going over the pass. I had to follow two snowplows all the way from the pass down to the DOT facility past the railroad portal. I finally arrived at Camp Serendipity at 1:20. There was another six inches of snow on the ground that hadn't been plowed, but I had no trouble getting in and parked.
I spent the rest of the afternoon reconfiguring the range hood back to the rectangular duct rather than the round duct.
On Wednesday there was a beautiful blanket of new snow on the trees and the ground. I spent the entire day working on the hood installation. In the morning, I started with the duct work.
The first part was the interface between a 6" round duct and a flat plenum. This required a short length of 6" round ducting so that the interface was flush with the top of the inside of the cabinet.
Next I trimmed a 3 1/4x10" 90ş elbow so that it fit up against the back of the cabinet and mated with the round interface.
Then I fabricated a rectangular plenum which would hug the top of the cabinet with the round interface entering the top of it. This was done in two pieces, which is the way the rectangular ducting comes. After cutting the top piece and cutting out the 6" hole, I fastened it to the top of the cabinet with zip screws. Then I fabricated the bottom of the plenum. I formed the end of the plenum by bending the bottom of it up 90ş.
Next I cut a rectangular hole in the bottom of the cabinet so the duct could run through. Then I installed the rectangular elbow and a vertical run of the rectangular ducting to complete the plenum. By the time I finished, it was time for lunch and a nap.
After my nap I went to work mounting the hood under the cabinet. First I built a scaffold to hold the hood into position up under the cabinet. I used 5 short 2x4s resting on the tops of the cabinets that go on either side of the range, which is not there yet. On top of the 2x4s, I stood two concrete blocks on end, and a placed a piece of particle board on top of them. Then I stacked a bunch of short 1x4 boards on each side and rested the hood on top of them. But before I lifted the hood up, I had to install the four mounting screws.
Mounting the hood to the cabinet was a little tricky and aggravating because of what I consider a bad design on the part of the cabinet maker or the hood designer or both. It was clear that they weren't coordinated.
The hood is designed to be screwed to a flat surface on the underside of the cabinet. The underside of my cabinet is not flat. The bottom is about an inch above the bottoms of the front, back and side panels. In this cavity, there are 1x4 boards up against the side panels, but since they are only 3/4" thick, they still don't present a surface that is flush with the top of the hood. It seems clear that these short boards are intended to provide the anchors for the mounting screws, but when I located the screw positions, I found that the screws would go right in the crack between the 1/2" side panels and the short 1x4s. And, in one corner, the 1x4 didn't extend all the way to the front cabinet panel so the screw was less than an eighth of an inch from the edge of the board.
The supplied mounting screws were only 5/8" long, so considering the 1/4" gap between the hood top and the boards on the cabinet bottom, and also the thickness of the sheet metal hood top, it meant that the screws would only penetrate the wood by less than 3/8". That just didn't seem to be enough to me, especially if the screws went into the crack between the board and the cabinet sides.
The hood was also designed to have the mounting screws installed first but not all the way in. Then the hood was to be lifted up into an offset position with the screw heads going through oversize holes in the top of the hood, and then the hood needed to be pushed to the front a half-inch, or so, so that the screws would enter notches in the sides of the oversized holes. Then, in this position, the screws would be tightened up.
One problem this caused, as I already mentioned, was that if you didn't turn the screws all the way in, the penetration would only be 1/8" if you left 1/4" for slack to get the hood up flush. A second problem was that in order to push the hood into the locking position, there would have to be that much slack in the ducting interface, which in my case was tighter than that. A third problem was that for two of the screws, you could barely get a screwdriver up to the screws, and you couldn't see them when you did.
I fixed the first problem by choosing longer and bigger screws. I solved the second problem by brute force and awkwardness. First of all, I decided I couldn't use one of the intended screw positions at all. It was the one that was right at the end of the board and there wasn't enough meat to hold a screw. I left that one off for the time being.
I engaged the hood by pushing on the hood from one corner at a time to get the screw heads in their respective holes, slightly bending the ducting as I did. I started with the side with two screws. When that side was engaged, I twisted the hood and forced the other side to engage with the one screw. By that time I realized that it was already 7:00 and it was time to quit for the day. I snugged up the two easy-to-reach screws on one side of the hood and was happy at least that the hood was fastened into position well enough to last overnight. I headed for the shower.
On Thursday morning, I started by setting up an entertainment center that Andrew had given to me. I wanted to see whether the radio in it had any better pulling power than the radios I already had up there. After jury-rigging up the speaker connections, I learned that the reception wasn't even as good as the radios I have, so I packed it back up to return to Andrew.
Then I went back to work on the range hood. First, I removed the scaffold since the three screws were sufficient to hold the hood in position. Then I tackled the problem at hand.
The problem was that fourth screw. Rather than use the intended screw hole, which didn't have good wood backing, I decided to drill a new hole in the top of the hood so that the screw would go into solid wood. The problem was that there is almost no space inside the hood to reach up to a good screw location. There was room for the shank of a long screwdriver, but no room for a screwdriver handle, much less for a hand gripping the handle.
Then there was the problem of seeing what you were doing up in that narrow space. To solve the problem, I did a lot of jury-rigging. To drill the hole, I used a long, maybe 18", extender I had that I could chuck in the drill. But the end where I had to mount the bit was a hole somewhat smaller than 1/4", but bigger than the size hole I wanted to drill, with a set screw in the side going into the hole. After a couple different attempts, I ended up cutting a 1" strip of sheet metal, wrapping it tightly in a spiral around the shank of the bit I wanted to use, and then successively trimming the end of the sheet metal until the coil would barely go into the hole in the end of the extender. Then I tightened the set screw up against the coil and the bit was held tight and reasonably centered.
Now that I had a workable drill, the next problem was that my neck and back are not flexible enough for me to look straight up from a kneeling position, and even if I could, it would be just too awkward to work in that position. So I stretched the piece of particle board over the top of one bottom cabinet unit and over to a pile of boards on a nearby table to make a platform which I could lie on on my back. This would put my head and eyes almost directly under where I had to drill the hole and install the screw. It's a good thing I always wear safety glasses.
Lying on my back, with a flashlight in one hand and my drill in the other, I was able to barely see what I was doing. But after a few tries, I got a hole drilled through the sheet metal top of the hood.
The next problem was getting a screwdriver that would reach up there. I ended up using three bit holders end to end in my cordless drill with a Philips head on the end and my screw balanced on top of that. With a little work and luck I got the screw into the hole and fastened snugly drawing the hood nicely up into position. It was very gratifying.
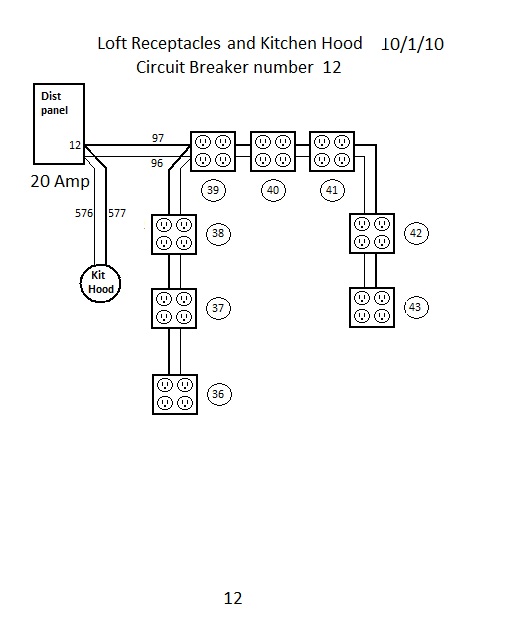
Next I turned off breaker number 12, which powers the hood, hooked up the wiring, turned the power back on, and tested the fan. It worked.
Finally, I put the panel and filters back on the bottom of the hood and it was finished except for the light bulbs which were not included with the hood.
I tested the fan again with the whole thing back together, and it is very powerful. I am very happy with it. The last part of the project was to cut a rectangular notch in the back of the shelf I had removed from inside the cabinet so that it could accommodate the duct. I did the sawing on the back porch to avoid a sawdust mess inside. When I finished, I was happy that the shelf fit nicely back in its place. I left for home at 1:00 glad to have that hood project completed.
©2012 Paul R. Martin, All rights reserved.
Go to Next Journal Entry
Previous Journal Entry
Index to all Journal Entries