2/24-26/09 I went up to the property for 3 days: Tuesday through Thursday.
I arrived at 11:50. There was snow on the road going over the pass and there was about 2 inches of new snow at the property. It was raining lightly when I got there.
I moved slowly and carefully carrying my gear to the trailer and the cabin. It was only the fourth day after my knee surgery so I didn't want to injure it. It actually felt about the same as it had for the previous few weeks prior to surgery.
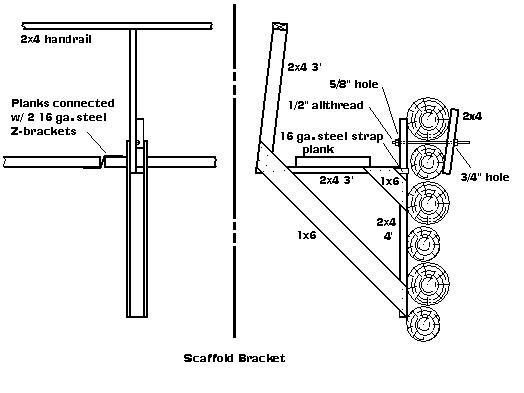
After moving in and having lunch I set up a scaffold on the outside between the kitchen and dining room windows so I could install the back flood lights. I used my usual scaffold system hanging from two brackets. I set the 20 foot extension ladder up on the back stoop, and with the ladder fully extended, I could reach the plug in the hole by the dining room window. I climbed up the ladder and fastened a length of masking tape to the plug and stuck the other end to the window frame. On previous occasions, I have lost the plugs when I popped them out and had to make new ones. Using tape like this was a new idea to keep from losing the plugs.
I could reach the other plug from the back porch and I fastened tape to it like I did the other one. Then I went inside and got two all-thread bolts and shoved one through each hole and knocked the plugs out on the outside in the process. The plugs then just hung there from the tape according to plan.
With the bolts sticking out of the holes, I got two scaffold brackets from the crawl space, and fastened them to the protruding bolts with a nut and washer each. It was a little tenuous carrying the one bracket up the ladder but I took it slow and easy, stepping up only with my left foot so as not to stress the sore knee. I carried the bracket in the crook of my left arm so I didn't have to hold the entire weight of it in my hand or fingers. It was a little bit of a stretch to reach out with the bracket to thread it over the bolt without pushing the bolt back into the wall, but I got it done without much trouble.
Once the bolt is through the hole in the bracket, the bracket will stay in place even without the nut and washer so you can relax and let the weight off your hand and arm. Then it is an easy job to put the washer on and turn the nut on.
With both brackets bolted on, I used a wrench from the inside of the cabin to snug them up.
Next, I screwed together some small pieces of 2x8, 2x4, and 1x2 to make shims to prop the bottoms of the brackets out away from the wall enough so as to level the brackets, and then I installed the shims.
The next step was to install the planks. Rather than use the ladder for that, I installed them from the porch. But first, I got a long 2x4 and shoved it over both brackets. With the 2x4 in place, I could slide a 2x10 plank over it until it reached to the far bracket. And with the first plank in place, it was easy to slide the second one over the first one.
Finally, I set up a small ladder on the back porch so I could climb up onto the scaffold and screw down the 2x4 hand rail. This gave me a nice comfortable and safe platform from which I could install the flood light fixture on the outside wall.
I put the necessary tools in a bucket and took that plus a stool up onto the scaffold and proceeded to install the light fixture. After using the 6-inch and the 4-inch hole saws, followed by hammer and chisel, I got the recesses cut for the fixture and electrical box. Then using a 1 1/4 spade bit, I bored the hole to accommodate the wire clamp on the box, and I used a 1/2 inch augur to make a hole to accept the green screw. Finally, I used the 1/2 inch augur to bore the hole from the hole for the clamp all the way through the log for the wire.
With the wood cutting completed, I got the can of stain and stained all the newly cut wood. Then I went inside and shoved the wire through the hole from the inside so it came out the other side.
Back up on the scaffold, I shoved the end of the wire through the clamp in the electrical box, screwed the box into the recess in the log, and fastened the ground wire to the green screw. Then I labeled the wires, prepared their ends, fastened the wires to the fixture wires, and mounted the fixture to the box. It was a fun and pleasant job sitting on the stool up there under the eaves with the rain pouring off the roof just beyond my scaffold.
I screwed the bulbs into the fixture and then hot wired the circuit to test it. To my dismay one of the bulbs did not light up. I was afraid there might be a problem with my wiring because both bulbs were new, but when I switched bulbs I discovered that one of the bulbs was bad. I got another bulb and was pleased to see both of them lit. I was happy that the part of the job on the outside of the building was done and there was still quite a bit of daylight left.
I reversed the process of installing the scaffolding in order to disassemble it. The final step of pounding the plugs back in the holes was easy since the plugs were still hanging from the strips of tape. Once the plugs were knocked back in, I removed the tape happy that it worked so well. I didn't have to hunt for the plugs among the debris on the ground.
I was also very pleased that my knee held out for the entire process. I had moved slowly and avoided any twisting or jerking. There was one incident, though, that I should report. Once when I first got the scaffold set up, I stepped off the scaffold and onto a rung of the ladder I heard a loud crack and felt the rung break. I had a tight grip on the ladder with both hands and I took most of my weight off that rung and gingerly climbed down the ladder.
The ladder was an old aluminum one of Leonard's that I had been using for all these years since he died. The rung in question had been damaged when he had the ladder, but had given me no trouble before. This time, though, two big cracks developed that went almost all the way through the rung. I could no longer trust it.
I got one of the 1/2 inch allthreads that I use to hang scaffold brackets and I cut a length of 1/2" EMT and another length of 3/4" EMT with the intent of running all three through the cracked ladder rung and bolting it tight to the ladder stringers. As it turned out, the rung was bent enough so that the 3/4" piece didn't fit through. So I used only the 1/2" piece and the allthread with a couple big washers and a nut on each end to reinforce the rung. With that done, I am sure that rung is now stronger than any of the others.
On Wednesday, I decided not to take the time to get firewood and light a fire in the stove even though I would be working inside most of the day. Instead I set up the electric heater in the corner of the living room so that it would warm that corner up. That way I could warm myself in front of it almost as well as I could in front of the wood stove. It didn't heat the entire building, but it did allow me to warm up when I decided to take a break.
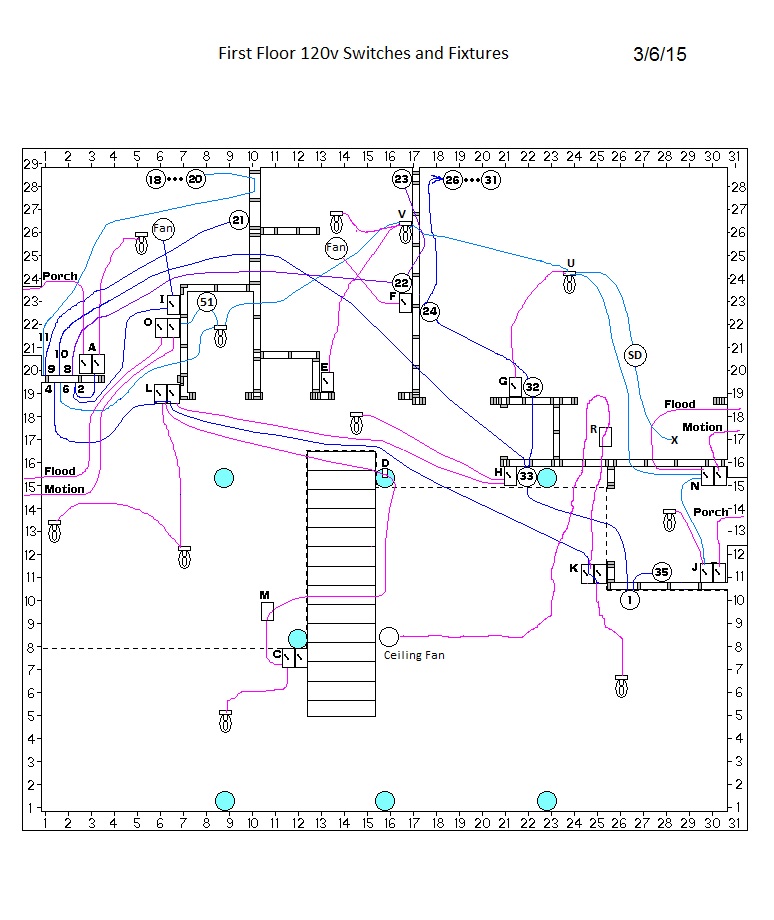
I strung the wire from the newly-installed flood light fixture through the loft floor over to the utility wall and from there down to box O. I had previously installed a single gang switch box for box O so I replaced that with a double gang box. This will house a switch for the flood light in addition to the motion light I will install in the back.
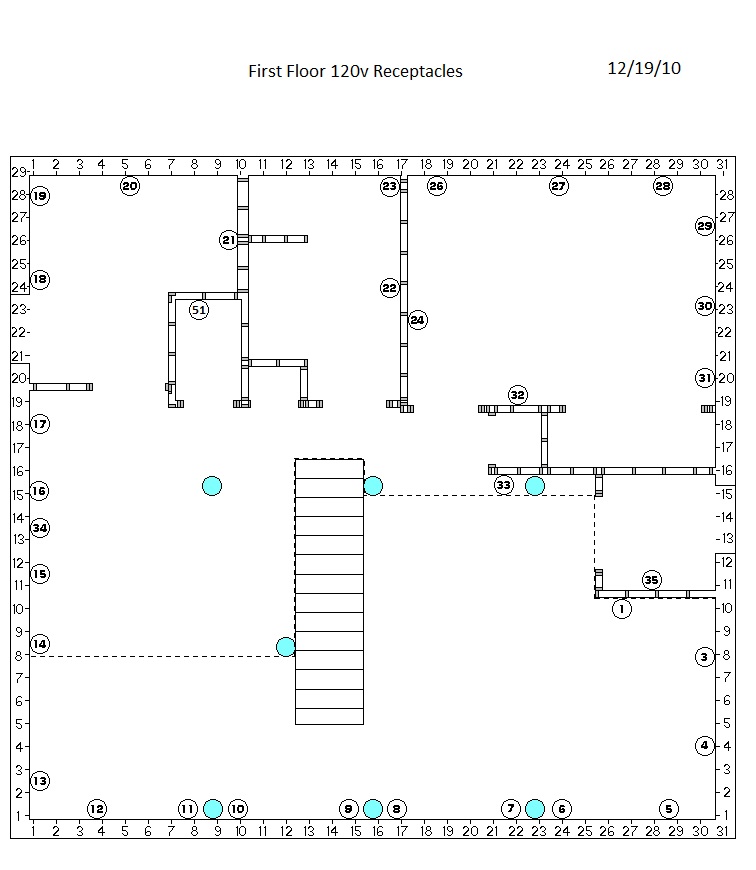
I noticed that the wire I had installed running from the receptacle box 36 to box O was a little short. I agonized for a while whether to leave it short or to go to the trouble to replace the wire. I imagined that box O would be precisely the one the inspector would have me open for inspection if I left that short wire in there, so I decided to replace it.
That took a little doing because box 36 is at the very top of the pantry, for eventual use in my wiring closet, so to reach it I had to build a scaffold over the top of the junk in the pantry. I had done that before so I just did it again using the same plan. I replaced the wire from box 36 to box O and then dismantled my pantry scaffold. Finally, before lunch, I installed the switches and wired up box O except for the wire to the motion light.
After lunch and a nap, I set up a scaffold so I could reach the site of the motion light. It is on the sill log above and to the right of the crawl space door. From there, the light has a straight shot down the hill to the concrete staircase and also up the trail to the privy.
I used a ladder up against the cabin and a hanger on the ladder that supported two 2x10 planks. The other ends of the planks reached the third step of the back staircase. It was low enough to the ground that I figured I didn't need a hand rail on it.
From this scaffold, the fixture was mounted at shoulder height so I didn't use a stool. I did the work standing up. Otherwise, the procedure was almost identical with that of the installation of the flood light so I was pretty good at it. Everything went smoothly until I went to screw the ground wire to the green screw in the fixture. At that moment, the big screw in the middle of the fixture that holds it to the electrical box fell out and dropped to the ground. I hadn't paid much attention to that screw but I knew it was a special one. It was about 2 1/2 inches long and was a little bigger than a number 10 screw. And I only had that one.
I didn't see clearly where it landed on the ground, but the ground there is a jumble of concrete crumbs, wood chips, sawdust, dirt, pine needles, old maple leaves, rocks, concrete blocks, pieces of wood, etc. Sitting uncomfortably on my bent bad knee, I patiently sifted through that debris in about a 1 square yard area long enough to become intimately familiar with each little piece of detritus. But no sign of the screw. There wasn't a lot of daylight left so I was afraid my options were limited.
In the spirit of serendipity that accompanied so much of my project, I decided to see if I might find a screw that would work. I have a chest of about 160 small metal bins that I got from Earl many years ago and about half of those bins contain an odd assortment of items that I never have inventoried or cataloged. I have had a plan for some time to do just that, but it wasn't done. What I have done in the past when I needed something is to just start at the upper left hand corner and look in each bin to see whether what I need is in there. Many times I have found what I needed so why not this time?
In the second box, there was a screw that looked like it might work. I tried it and it was too small. I think it was a 10-24 stove bolt and it was too small in diameter. So I went back to the bins and kept looking. In about the sixth box, I found a half dozen Allen-head machine screws that were bigger in diameter. Unfortunately they had fine threads so I figured that they wouldn't work. But, rather than rule them out, I decided to try them just to get a better idea of what I needed. I felt a flood of relief when I turned the screw into the bracket and found that the threads matched exactly. The only problem was that the screw was about a half inch too long.
That I could fix. I used the vise and a hack saw to shorten the screw and then used the grinder to taper and smooth the end so it would start nicely in the bracket. I was all set. All I needed now was an Allen wrench. I went up to the cabin and found a set of Allen wrenches in one of Gus's tool boxes and went down to finish up the job.
When I got back up on the scaffold, for the life of me I couldn't find that screw I had prepared. I had the wrench but no screw. After stewing and looking for a few minutes, I went back to the bin, got another long screw, sawed it off, ground it smooth, and kept it safely in my hand as I went back up on the scaffold.
To install the fixture, you have to get all the wires stuffed inside, get the gasket centered all around the hole and behind the fixture flange, and then get that screw through the center of the fixture to engage in the threads in the bracket without being able to see it. I was amazed that once I got the thing lined up properly, that screw went right in and mated with the threads inside. I tightened it up with the Allen wrench and the fixture pressed snugly against the gasket and the job was done. I felt a great sense of relief and serendipity.
With the motion fixture installed, I dismantled the scaffold and then went into the crawl space and strung the wire from the fixture along the floor joists over to a hole I had drilled in the plate under box O. I shoved all the slack of the wire up through that hole and stapled the wire to the joist. Then I went upstairs and hot wired the light. I was delighted to see it come on when I went back down and moved in front of it. I went in for the night very happy.
On Thursday morning my right leg was very achy. I moved slowly, but my leg hurt most of the time anyway. I probably did a little too much on the scaffolds and stairs the day before. I finished wiring up box O with the motion wire, which I did sitting on a stool. Then I did some cleaning up of the place interspersed with several warm-up breaks in front of the electric heater. All the wiring was done that I intended to do before the scouts come back up and I just didn't seem motivated to do the cleaning up that I also want to do before they come up.
On one of my warm-up breaks, I got an inspiration that motivated me to go right to work on a project I had been putting off. I figured it was exactly the right time to start inventorying and cataloging those metal bins. They had saved the day yesterday and I figured they would be even more useful if I knew what was in them.
My plan was to make 180 numbered tags at home on the computer, put the tags on the bins, dictate the contents of each bin using an audio recorder, enter the information into a spreadsheet, sort the spreadsheet by item description, and print a copy for use at the cabin. That would minimize the amount of time I would spend on the project at the cabin.
I had already made the tags in October of 2008 so I got the tags out and went down into the crawlspace and spent about an hour placing 158 tags on 158 bins. I was able to sit down while I did it so it didn't aggravate my knee too much, although it was still aching.
When I finished that, I closed up the place, had lunch, and left for home at 1:45 feeling very good about the week's work.
©2009 Paul R. Martin, All rights reserved.
Go to Next Journal Entry
Previous Journal Entry
Index to all Journal Entries