There were many factors that came into play in determining the final shape and composition of the roof. Here, I will try to spell them all out in one place in a sort of logical sequence so that you can understand why the roof ended up being what it is.
THE DESIGN
Since I am no architect, I gave almost no consideration to the esthetics of the building design. Instead, my major criteria were functionality, simplicity, and ease of construction. So, early on, with the advice of Skip Ellsworth, I decided that my roof would simply be two rectangles joined at a ridge. No hips, no valleys, no dormers, or sheds. The only penetration I wanted was a chimney as near to the ridge as possible. Otherwise, if the chimney were lower down, I would have to worry about snow buildup behind it. I have seen the power of 8 feet of accumulated snow when it starts moving and melting, and I didn't want to have to build any structure to have to withstand that.
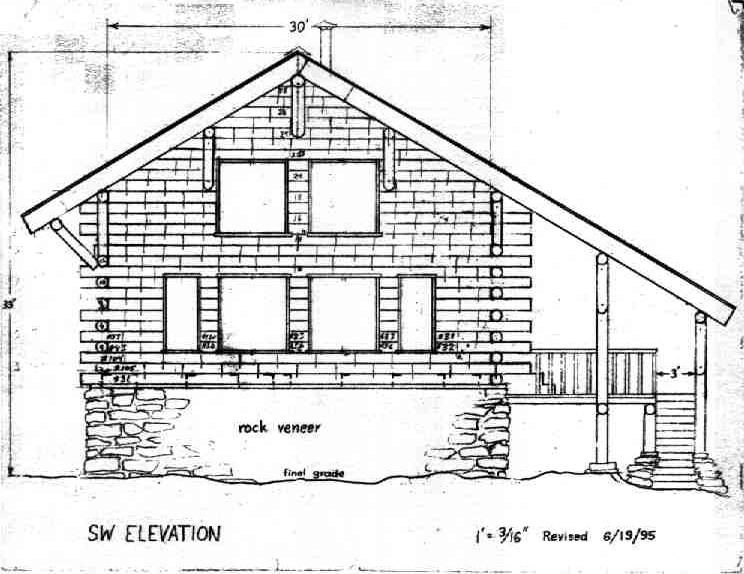
The pitch was determined mainly from the advice I got from Vladimir. He said that all things considered, a 30 degree roof was ideal. It was steep enough to shed snow, and yet not so steep that you couldn't walk on it. So, when drawing the elevation views of the building, I tried to keep the pitch at 30 degrees.
Because the shape of the rock cliff limited the depth of the building (i.e. the dimension running from southwest to northeast), and I wanted the building to be as deep as possible, there was no room for a porch deck on the cliff side of the house. That space was needed for an access roadway in order to get a vehicle past the building. So, the porch ended up on the southeast side.
I also wanted the gable end of the building to face southwest over the cliff in order to maximize the view. That meant that the porch roof would be a continuation of the roof on that side of the building. In order to help the snow slide off the roof, I didn't want the porch roof to have any less pitch than the main roof.
Since I wanted the porch deck to be 16 feet wide, a major design limitation was the required head room at the edge of the deck. Fixing that point on the drawing, and continuing the roof up to the ridge at 30 degrees, made the peak of the building a lot higher than I wanted it to be. If the porch roof and the main roof were not continuous, this would make the problem even worse.
From these considerations, I made two decisions. One was to lower the porch two steps below the level of the main floor, which effectively lowered the ridgepole of the building by that much, and the other was to make what is called a cat-slide roof. That is, to make the combination of the main roof and the porch roof all one continuous roof at the same pitch. I figured that would simplify construction and make for a better roof since there would be no horizontal seam. The continuous diaphragm would also give lateral strength to the porch structure.
With those decisions made, the elevation view of the building was set in stone, so to speak, and the pitch ended up being 7/12 (or 12:7 as my old roommate Earl Edwards would express it). This design meant that the non-gable log walls in the loft would be about shoulder high. That would mean a couple extra log courses, but it also meant that virtually all of the loft floor space would be usable. I thought that was a worthwhile trade off (and I still do).
When I sketched the elevation view of the building, I just sketched in the eaves in a proportion that I thought looked like what I wanted. I wanted big eaves to keep the walls and the ground near the building dry. It also made the proportions of the house look good to me.
Measuring these eaves to scale on the drawing, they turned out to be about 6 feet, so that is what I decided to make them. The final dimensions of the roof, however, were determined by a rule that I adopted and held to. That rule was that any surface to be covered by plywood or OSB, such as floors and roofs, had to be a multiple of four feet in the direction of the rafters or joists, and a multiple of 16 inches in the other direction. Both the rafters and the joists were to be spaced 16 inches on center. That rule was made to minimize cutting. Since my roofs and floors were largely rectangular, that would mean that only a few of the 4x8 sheets would have to be cut in order to make them all come out even. I think that plan not only worked out well, but paid off big time.
So, the dimensions of the roof ended up being 41 feet 4 inches long in the horizontal direction, with the slanting direction being 40 feet on the big side and 24 feet on the small side. That meant that the ridgepole and all the purlins needed to be exactly 41 feet 4 inches long. The rafters and OSB come exactly to the ends of the purlins, and the fascia board goes on the outside of all of them.
THE MATERIALS
Skip had cautioned us that if we wanted to use log rafters, they needed to be extra straight. I had trouble enough finding logs for the walls the way it was, much less super straight ones, so I ruled out log rafters fairly early.
One of the most difficult problems I had in getting my building permit was meeting the requirements for energy. After a lot of haggling and confusion, I finally was able to come up with a design that qualified. Part of the requirement was to have R38 insulation in the ceiling. Using standard insulation, this meant that my rafters needed to be at least 11 7/8" deep. Looking back, this strong of a rafter probably meant that I wouldn't have needed the Grid B, D, and F purlins after all. But, by the time I learned about the deep rafters, the log structure had already been designed and I didn't want to change it. So, instead of having the required 95 psf live load roof, I have something on the order of 300 psf. Not only will my roof easily handle any snow load that happens to fall on it, but it will probably be able to take a direct hit from any big tree that happens to fall on it as well.
I sat down with the people at Marson & Marson to specify the materials in the plans, and they convinced me of the wisdom in choosing TJI for joists and rafters. The convincing arguments were that TJI is stronger, straighter, lighter, more uniform, and cheaper than dimension lumber, and it can come in 40 foot lengths. The only disadvantage is that you can't let it sit out unprotected in the weather for as long, although it can still take quite a bit of rain and sun without being hurt too badly.
A similar choice was made for using OSB on the roof rather than plywood, although OSB is not quite as strong as plywood. I made up for this by choosing 3/4" OSB where I think I could have used 5/8" plywood. Even at that, I think the OSB was cheaper. I decided against OSB in favor of T&G plywood for the subfloors, however.
CONSTRUCTING THE ROOF STRUCTURE
The basic structure holding up the roof are six log purlins and a log ridgepole. These were placed as part of the construction of the log walls of the building. Each purlin was flattened for its entire length and the ridgepole was flattened on two surfaces to form the peak of the roof. These flat surfaces were aligned to form the bearing surfaces for the rafters. But, between the purlins and the rafters, I nailed a 1x8 T&G pine board of the type I plan to use for the ceilings. Without these ceiling boards on the purlins and ridgepole, the ceiling boards on either side of the purlins would have to mate with the surface of a log. Since these surfaces are irregular, each mating board would have to be scribed and cut to fit, and, even if that were done perfectly, the joint would still be made of a corner mating with a surface. It would be very difficult to make this joint ant-proof.
By installing a ceiling board between the rafters and the purlins, the mating of the additional ceiling boards would be tongue-to-groove mating with these previously installed boards. No scribing or fitting would be required and the joint would be ant-proof. This would be well worth the effort of installing the ceiling boards on the purlins. What I didn't figure out until the last couple purlins, was that the easiest thing to do would be to install these boards on the logs even before they were raised up onto the building. Once they were up there, it was hard to reach them to install the boards. So in some cases, I waited until just before I installed the rafters so I could reach them from the newly installed rafters.
The installation of the rafters is described in detail in another document. Once the rafters were installed, the installation of the OSB was fairly straightforward and relatively easy. The only complications were the installation of the chimney and the building of a walkway from the ground up to the roof so that the OSB panels could be carried up in one shot. This walkway was built on a log structure made from the retired crane booms and mast. They formed two rails going from the edge of the rock wall on the lower part of the upper roadway, up to the east corner of the roof. This structure was decked over with seven sheets of OSB. I kept it tarped when I wasn't using it to protect it from the weather.
All the OSB was in place barely in time for the winter of '99-'00. The roof was tarped in its entirety throughout the winter. In the spring, the major objective became to get the roofing on.
THE ROOFING
For roofing, I knew I wanted the best quality of metal roofing I could get so there would be no maintenance and maximum fire protection. I also figured that I wanted continuous 40-foot panels on that long side, although I didn't know enough about metal roofing to know if that objective was reasonable, or even doable.
I began to look into suppliers of metal roofing and I ran into a few constraints. One was that in order to get 40-foot panels delivered, they would have be crated, then hauled on a flat-bed semi, and they would require a crane on the job site to unload them. This would make them prohibitively expensive.
The alternative to this, was to have them fabricated on site. Bill Odgers put me on to Curt Pritchard at CP Sheet Metal who had a machine that could do it. He suggested that I find someone with a similar machine on the other side of the mountains. I found Matco Enterprises in Wenatchee who have such a machine and I got a bid from them. They would install the roof for $10,985.00 or just supply the panels and material for $8,372.00. They normally hoist their machine up to the edge of the roof and squirt the panels directly onto the roof. But in my case, the building is inaccessible from all sides so the panels would have to be carried up by hand. This extra labor is, I am sure, the reason they priced the installation job so high.
When I got a bid for materials-only from CP, I made a mistake and gave them way too big a number for the number of squares. So, in the midst of pondering these expensive alternatives, Dr. Dick, and his wife, Diantha, wrote to me encouraging me to install the roof myself, and that if I wanted to pay $10,000 for a roof, that they would come out and install it themselves for that price.
So, I went back to CP, discovered my error, and talked to them about installing the roof myself. They were immensely helpful and taught me everything I needed to know about it, and they convinced me that I could do it myself. The only thing I would need help with would be carrying the 40-footers up onto the roof. One person can't pick one up without having it kink and thus be destroyed. I contracted with them to deliver the panels to my building site, and I would do the installation.
The panels are interlocking, 16 inch wide net, 24 gauge, Kynar finished, steel with hidden fasteners. Each 40 foot panel weighs about 70 lb. It was impressive to watch Sean and Mike from CP Sheet Metals as they produced and stacked all those panels. They started with three 1800 to 2000 lb. rolls of Kynar finished sheet steel which they unrolled and fed into their machine. The machine sucked this flat steel in one end, and produced the finished product out the other end in a continuous stream.
They had set up a pair of horizontal pipes on stanchions running out a little over 40 feet from the end of the machine, and as the panels came out of the machine, they slid and rested on top of these pipes. There was a limit switch mounted near the end of the pipes so that when the panel reached the exact required length, the machine would stop, cut the panel off, and wait until the limit switch was flipped again. As soon as the two guys picked the new panel up off the pipes so they could stack it, the switch would get flipped and the production of the next panel would start immediately. The CP crew arrived somewhere around 9 or 10 AM and they were finished by 2:00 PM. It was a very quick and efficient operation.
There was a lot of time consuming incidental work that I had to do before I could begin installing the panels. In addition to laying down the tar paper, the harder job was installing the fascia boards. I installed the ones on the gable sides from the roof. The other two sides I did from scaffolds, which themselves took a lot of time to set up. I also had to build an extension to the walkway to the roof that I had used to carry up the OSB.
This extension cut the corner of the hairpin turn and joined the upper walkway at the lip of the rock wall. With it, it was almost the same pitch walking from the stack of roof panels down at the old log pile up to the roof. The turn was gentle enough so that it looked like a 40-foot panel could make the turn without hitting bushes anywhere.
I used this setup to carry up and install the 24-foot panels by myself. I carried them up the big roof, over the ridge, and down to the other side. Curt Pritchard had told me that the major problem in installing the panels was to keep them from "walking" out of alignment as you went across. Then, when you get to the end, you would have to rip the last panel to fit the space you had left. I told him that I was not about to rip a 40-footer by hand with a tin snips up on that roof, but instead, I was going to get the panels to come out exactly even. After all, my roof width was an exact multiple of 16 inches and his panels were exactly 16 inches wide. He doubted that I could do it but he encouraged me to try.
My method for getting the panels to come out exactly right was to install the first panel and then pre-drive two pilot screws for each panel across the entire roof before installing any more panels. Once the first panel was installed, I fastened a 100 ft. tape to a screw in the highest clip holding the panel. Then I drove a screw into the roof, and unscrewed it again, every 16 inches all the way across the roof. Then I did the same thing for the lowest clip on the panel. I made sure that the last hole I made was in the correct position for the clip on the very last panel.
Each time I installed a panel, I put the first screw in the top clip into the hole I had made, and the second screw went into the hole for the bottom clip. This put the panel in exactly the right position and I then fastened all the rest of the clips. It worked like a charm and the last panel came out exactly right so I didn't need to rip it.
When the small roof was finished, I needed to get all the long panels stacked on the big roof. I couldn't find anyone to help me carry them whose schedule matched with mine. I decided to have Dave and Bill help me on the weekend that we planned to be on a family camping trip at Lake Wenatchee. Ellen wouldn't hear of that because we were supposed to be camping, not working.
She asked me if I thought she could do it and I said that I doubted it. She wasn't convinced and said she wanted to try. So, we went up to the property on July 1, 2000. You can read the amazing details in the Construction Journal, but we ended up getting all 31 of those long panels up on the roof in two stacks by the end of the day.
Then I had a stroke of bad luck and a stroke of good luck. The bad luck was that the cleat I had screwed down to the roof to hold the second stack, had broken loose and the entire stack of 15 panels had slid off the roof. The good luck, though, was that the log structure I had built to hold up the walkway stopped the whole stack after it had slid only 18 inches. Some of the panels were bent a little but otherwise none was damaged. If they hadn't stopped, the entire stack would have been ruined. I felt very foolish and very lucky. I also reinforced the cleat holding up the other stack as soon as I possibly could.
I was able to drag each panel off the stack and across the roof by myself, so from this point on, it was fairly routine for me to install the panels on the big roof using the same technique to keep them in alighment that I had used on the other side. Once the ridge metal was installed, I was pretty much done with the work on the roof, and I was very relieved to have that part of the project behind me. I now feel that I am an expert in yet another skill that I will never use again.
©2003 Paul R. Martin, All rights reserved.